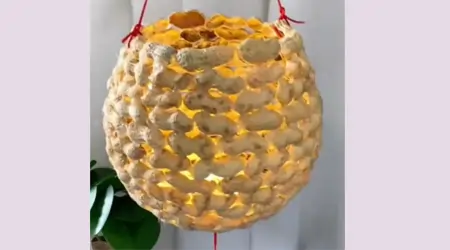
Creative Recycling: Making a Beehive-Looking Lantern from Peanut Shells
The warmth of natural materials and the originality of handcraft are priceless in home decoration. Today, we are turning the peanut shells that you see as waste into a stylish, authentic and beehive-like lantern that will change the atmosphere of your home. With just a balloon, some glue and patience, you can create wonders!
Here is the step by step natural lantern making guide:
Required Materials
Adequate amount of peanut shells (cleaned and dried)
1 latex balloon (the size of the lantern depends on the balloon)
Strong clear glue (wood glue or hobby glue)
Brush for applying glue
A small bowl (to stabilize the balloon)
LED candle or battery-powered light string (Do not use real candles, it creates a fire hazard!)
Optional: Twine and varnish for hanging.
How to do it step by step
1. Preparation and Inflating the Balloon:
First, prepare your peanut shells. After removing the peanuts inside, gently clean the shells and make sure they are completely dry. Inflate the balloon until it reaches the size of the lantern you want and tie it tightly. Place the balloon over a small bowl to prevent it from shifting while you work.
2. Process of Gluing the Shells:
Apply plenty of glue to the surface of the balloon using a brush. Start gluing the peanut shells in close and even glazes, resembling a beehive texture. Leaving very small gaps between the shells when gluing them will allow light to leak through and create a more beautiful image. Cover the entire balloon (leaving a small gap at the top for a socket or light to enter) with shells.
3. Drying and Hardening (Patience Phase):
This stage is the most critical part. Allow at least 24-48 hours for the glue to dry completely and for the shells to form a hard, integrated structure. Do not touch until the glue becomes completely transparent and the shells do not move. If you want, you can increase its durability by applying another layer of transparent glue or varnish on it at this stage.
4. Deflate and Light the Balloon:
After making sure that the shells are completely dry and hardened, make a small cut at the knot of the balloon and slowly deflate it. As the balloon deflates, it will separate from the shells. Carefully remove the deflated balloon. Now you have a beehive-looking, hard and stylish peanut shell skeleton!
Place your LED candle or battery-powered light chain inside. If you want, you can hang it by tying twine to the top.
Conclusion
Your lantern, which you prepared with natural materials and in accordance with the zero waste principle, is ready! The warm light leaking from this lantern in the evenings will add an authentic and peaceful atmosphere to your home.